Your First 5 Minutes with Ceros: See What You've Been Missing
.png)


Your AI agents are already running. They're connecting to tools, calling APIs, reading files. In five minutes you'll see all of it for the first time.
I want to walk you through what happens when you sign up for Ceros and install the agent for the first time. Not the feature list. Not the architecture diagram. The actual experience. What you see, what you learn, and why most people have the same reaction within the first few minutes.
It goes something like this: "Wait. I didn't know all of that was happening."
Step 1: Sign up and install the agent
Head to agent.beyondidentity.com and create an account. Then install the lightweight agent on a machine. Yours first, ideally.
npm install -g @beyondidentity/ceros-cli
ceros claude
That's it. Two commands. The agent wraps your Claude Code. Your developers don't change their workflow. They run their agents exactly as they did before. The difference is that Ceros now sits alongside the agent on the machine, seeing what it does in real time.
No proxy configuration. No network rerouting. No "please update your CI/CD pipeline." The agent lives on the device, right next to the AI tools, which is why it can see things that network-layer tools can't.
Step 2: Use your agent like you normally would
Don't do anything special. Just work. Ask your agent to do the things you always ask it to do.
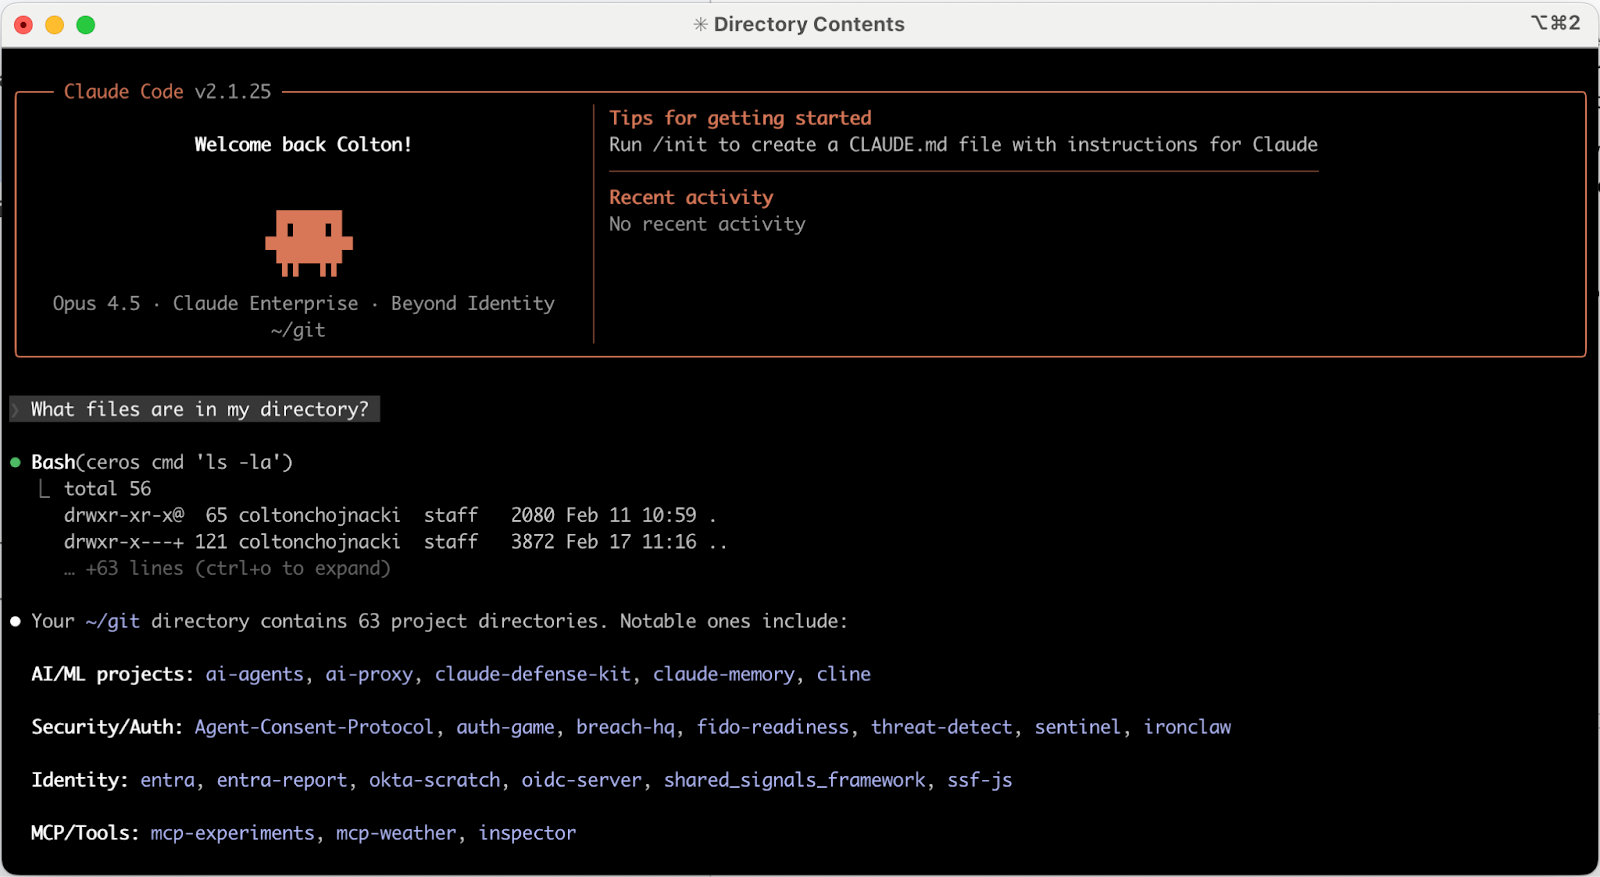
"What files are in my directory?"
"Search the web for the best food in New York."
"Refactor this function."
"Write tests for this module."
Whatever your normal workflow looks like, do that. The whole point of this step is that nothing changes for you as a developer. Your agent works exactly the same way. Every agentic action produces an audit trail, and you can guarantee it executed on a device that satisfies your security posture. You'll see why that matters in about sixty seconds.
Step 3: Go to the Conversations page
Now open the Ceros dashboard and navigate to Conversations.
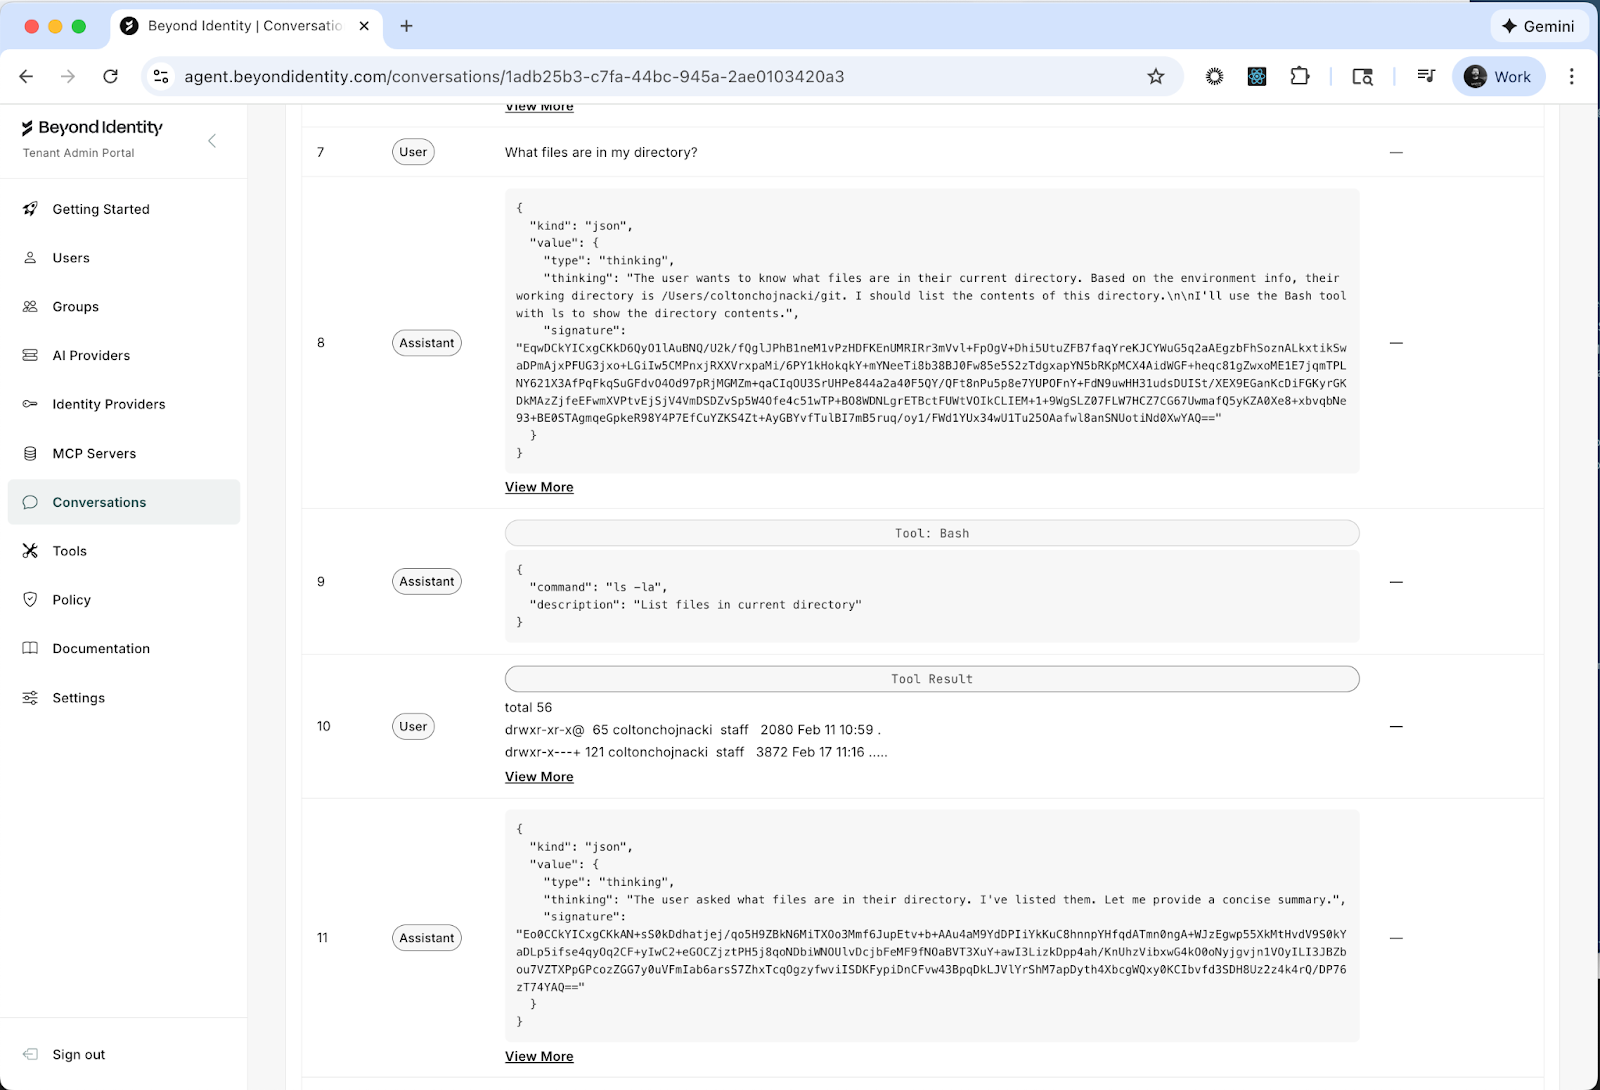
This is the transcript view of every agentic transaction that has taken place across your enrolled devices. Every conversation between a human and an agent, listed with who started it, when, and from which device.
Click into one of your conversations. The one where you asked "What files are in my directory?" is a good place to start.
You'll see the full back-and-forth between you and the agent. But look closer. Between the prompts and the responses, you'll notice something: tool calls. Lots of them.
What is all that about?
When you asked your agent a simple question about files in your directory, the agent didn't just "know" the answer. The LLM instructed your agent to execute tools on your machine. In this case, something like bash ls -la. It ran a shell command, read the output, and used that to formulate its response. That one casual question triggered real execution on your device.
Now scroll through a few more conversations and watch the tool calls stack up. File reads. Shell commands. Web searches. API requests. Every conversation is a chain of autonomous actions that your agent took on behalf of a human, on a real machine, with real permissions.
This is what's been happening every time someone on your team talks to their agent. You just couldn't see it before.
Step 4: Go to the Tools page
Navigate to Tools. This page has two tabs: Definitions and Calls.
Definitions is your tool inventory. It displays every tool that has been discovered across your environment. Some of these ship out of the box with Claude Code: Bash, ReadFile, WriteFile, Edit, SearchWeb, and others. These are the built-in capabilities that let your agent interact with your machine and the internet.
But this is also where you'll see something more interesting: the MCP servers your users have connected to their agents.
MCP servers are how agents get access to external tools and services. A developer adds one to give their agent access to a database, or Slack, or email, or your production infrastructure. They're easy to add and most developers add them without thinking of it as a security decision. They're thinking about productivity. From a security perspective, each one is an integration point that connects an autonomous agent to a resource you might not have approved.
Click on any tool to view its schema. This is the set of instructions given to the LLM so it knows how to use the tool: what inputs it accepts, what outputs to expect, and how to invoke it. This is how the LLM "learns" what it can do. Every tool your agent has access to has one of these definitions, and now you can read them.
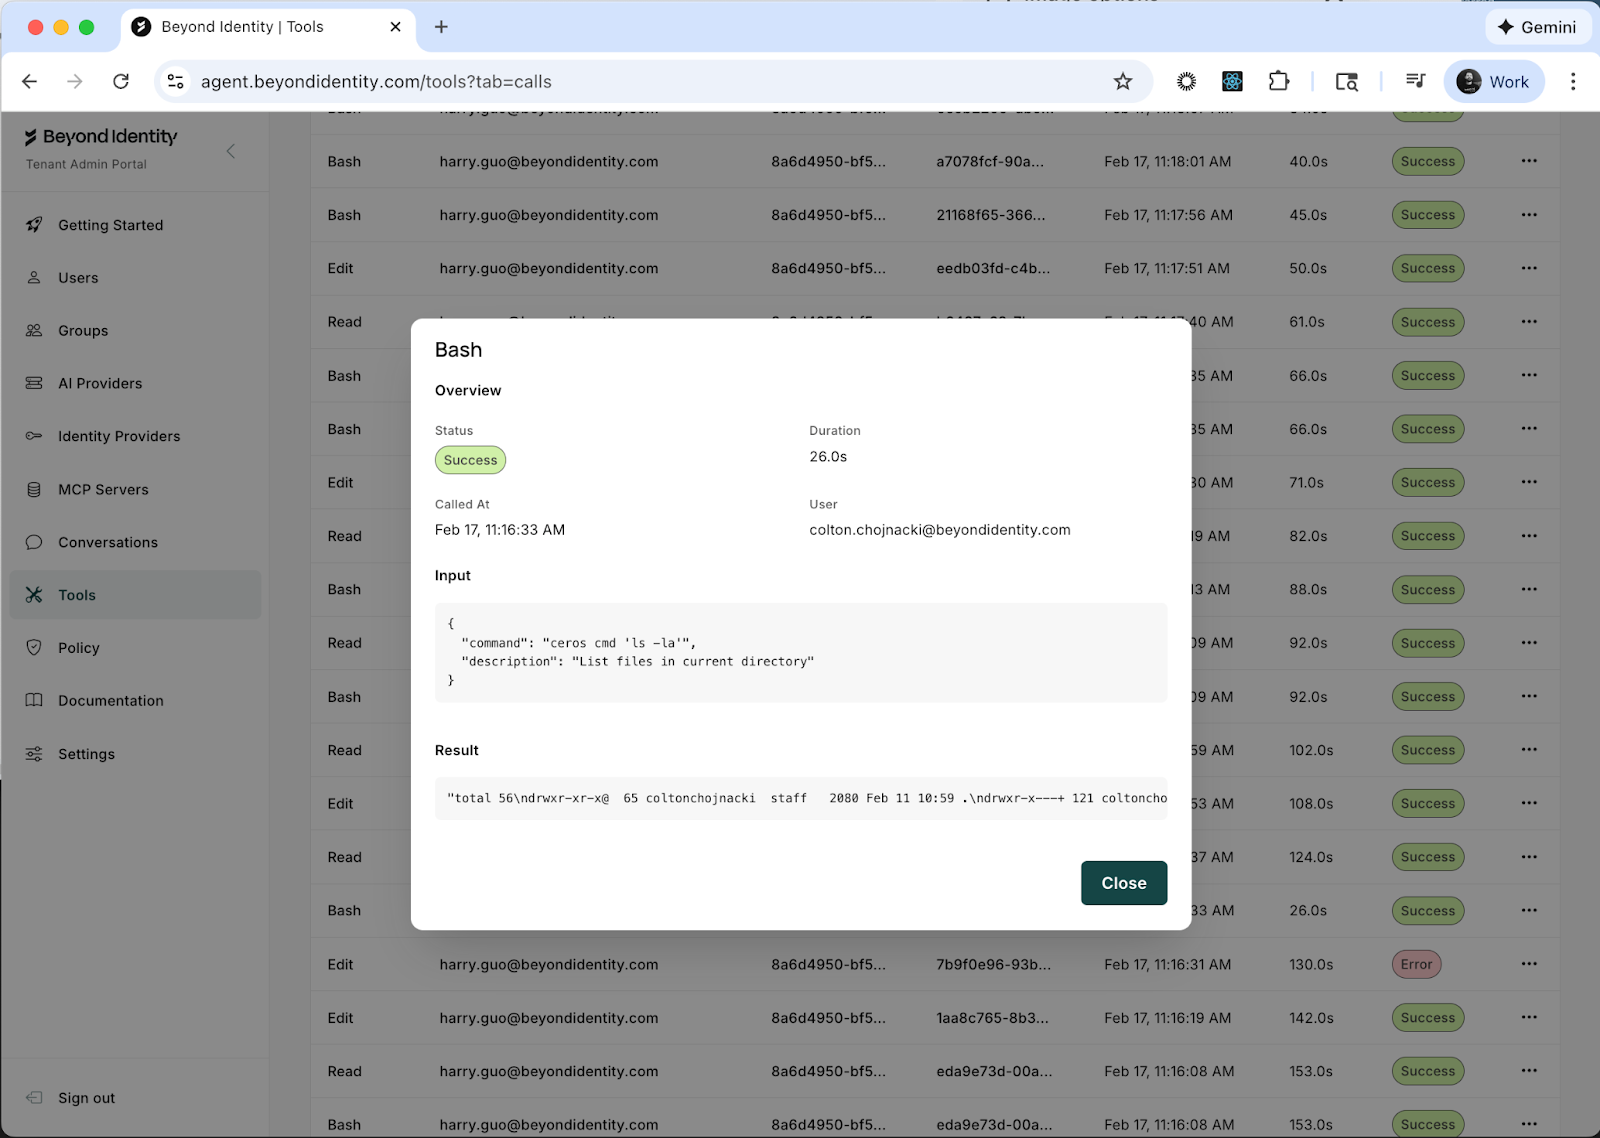
Now click the Calls tab. This is where you see what tools have actually been executed. Not just which tools exist, but which ones were invoked, with what inputs, and what they returned. Click into the details of any tool call and you'll see exactly what went in and what came out.
That bash call from your "What files are in my directory?" question? You can see the exact command that was executed, the arguments that were passed, and the full output that came back. For every tool call, across every agent, across every device.
Step 5: Go to the Policies page
Navigate to Policies. This is where you define access control rules for your agents and tools. You can write specific policies for invoking tools, launching agents, and connecting to MCP servers.
Don't worry about implementing a policy right now. A post on "What should your first policy be?" is coming soon. For now, I want to show you something else.
Click the Activity Log tab.
This is where Ceros gets different from anything else you've seen. Drill into one of the entries.
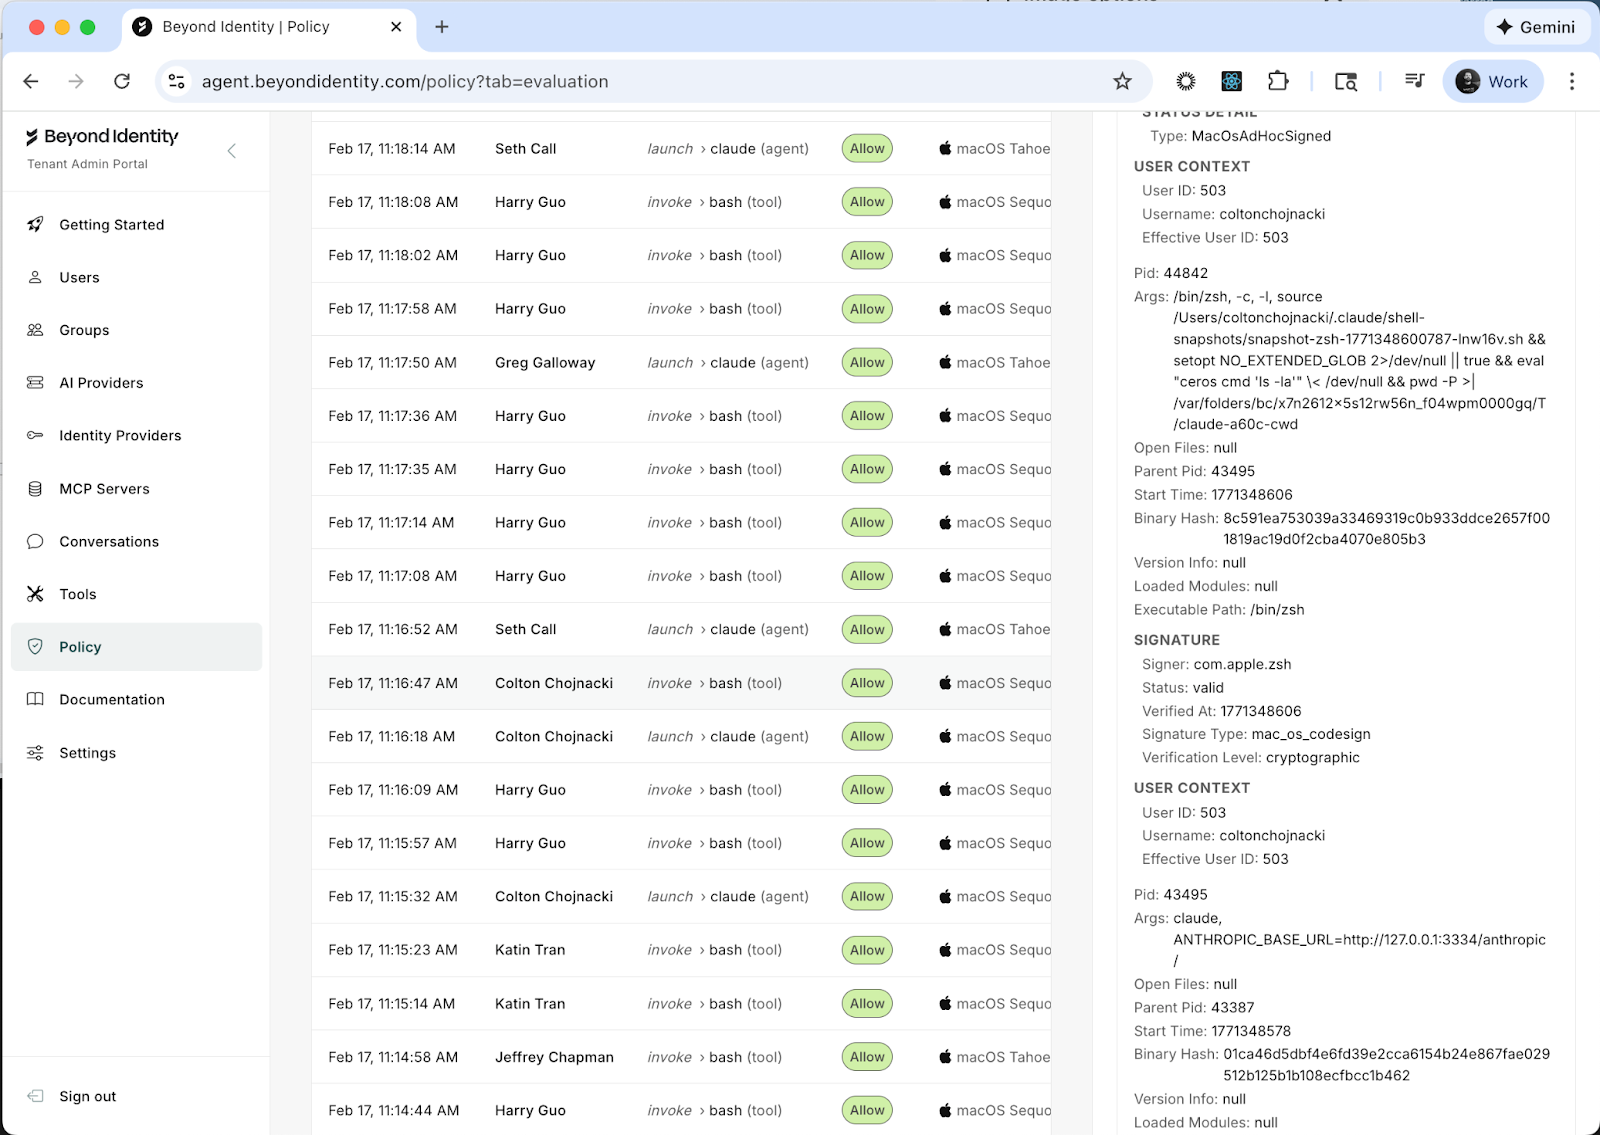
What you're looking at is not a log line. It's a complete forensic snapshot of the environment at the exact moment an agent was invoked. Here's the kind of detail you'll see:
The device that launched the session: macOS Sequoia 15.6.1, Darwin kernel 24.6.0, 16GB of RAM. Whether disk encryption is enabled (FileVault, specifically, and what encryption type). Whether Secure Boot is on. Whether endpoint protection is running. Whether System Integrity Protection is enabled, and if any protections have been disabled. Whether Gatekeeper is active. Whether kernel extension user consent is required.
The full process ancestry of how the agent was launched. Not just "Claude Code is running." The entire chain: /usr/bin/login spawned /bin/zsh, which ran /opt/homebrew/bin/node, which launched the Ceros CLI wrapper (ceros claude), which started the agent session. Every process in that chain is captured with its PID, start time, executable path, and the user context it's running under.
The binary signatures. Every executable in the process ancestry is verified. The Ceros binary, the Node.js runtime, the zsh shell, the login process. Each one is checked with macOS code signing verification, and you can see the signer identity, verification status, and whether it was cryptographically validated.
The user identity. Not just a username from a token. The OS-level user ID, the effective user ID, the username. You know that hpark (UID 502) launched this session from Parks-MacBook-Air.local, and you can tie that back to a verified identity.
All of this data is collected in under 250 milliseconds. It travels with every request the agent makes. And it's signed so it can't be tampered with after the fact.
This is what we mean when we say Ceros starts on the machine. Other tools see an API call and try to reconstruct context. Ceros captures the full picture at the source: which human, on which device, in what security state, through which process tree, using which verified binaries, launched which agent. Before a single token is generated.
What you know now that you didn't five minutes ago
You've gone from assumptions to evidence. You can see every conversation your agents are having and the autonomous actions they're taking on behalf of your team. You can see every tool available to those agents, including MCP servers you didn't approve, and you can inspect the actual inputs and outputs of every tool call. And you have forensic-grade detail on the environment where every agent session originated.
This is what we call going from Level 0 (blind) to Level 1 (visible). You haven't written a single policy yet. You haven't blocked anything. But you can now answer questions that five minutes ago would have taken days of digging through logs and pinging three different teams.
What comes next
Most people spend a day or two just watching. Seeing what the real patterns look like versus what they assumed. That's worth doing. You want to understand your actual environment before you start writing rules for it.
When you're ready, the next step is writing your first policy. We recommend starting with an MCP server allowlist: approve the ones you trust, block everything else by default. It's the single highest-impact policy you can write, and it takes about two minutes.
But that's the next post.
For now, sign up at agent.beyondidentity.com, install the agent, and go see what your agents have actually been doing. You've been making decisions about AI security without this information. Once you have it, you won't go back.
Ceros is built by Beyond Identity. SOC 2 Type 2 compliant. FedRAMP Moderate ready. Deployable as cloud SaaS, self-hosted, or fully air-gapped on-premises.
Follow me on X: x.com/coltonchojnacki
Your AI agents are already running. They're connecting to tools, calling APIs, reading files. In five minutes you'll see all of it for the first time.
I want to walk you through what happens when you sign up for Ceros and install the agent for the first time. Not the feature list. Not the architecture diagram. The actual experience. What you see, what you learn, and why most people have the same reaction within the first few minutes.
It goes something like this: "Wait. I didn't know all of that was happening."
Step 1: Sign up and install the agent
Head to agent.beyondidentity.com and create an account. Then install the lightweight agent on a machine. Yours first, ideally.
npm install -g @beyondidentity/ceros-cli
ceros claude
That's it. Two commands. The agent wraps your Claude Code. Your developers don't change their workflow. They run their agents exactly as they did before. The difference is that Ceros now sits alongside the agent on the machine, seeing what it does in real time.
No proxy configuration. No network rerouting. No "please update your CI/CD pipeline." The agent lives on the device, right next to the AI tools, which is why it can see things that network-layer tools can't.
Step 2: Use your agent like you normally would
Don't do anything special. Just work. Ask your agent to do the things you always ask it to do.
"What files are in my directory?"
"Search the web for the best food in New York."
"Refactor this function."
"Write tests for this module."
Whatever your normal workflow looks like, do that. The whole point of this step is that nothing changes for you as a developer. Your agent works exactly the same way. Every agentic action produces an audit trail, and you can guarantee it executed on a device that satisfies your security posture. You'll see why that matters in about sixty seconds.
Step 3: Go to the Conversations page
Now open the Ceros dashboard and navigate to Conversations.
This is the transcript view of every agentic transaction that has taken place across your enrolled devices. Every conversation between a human and an agent, listed with who started it, when, and from which device.
Click into one of your conversations. The one where you asked "What files are in my directory?" is a good place to start.
You'll see the full back-and-forth between you and the agent. But look closer. Between the prompts and the responses, you'll notice something: tool calls. Lots of them.
What is all that about?
When you asked your agent a simple question about files in your directory, the agent didn't just "know" the answer. The LLM instructed your agent to execute tools on your machine. In this case, something like bash ls -la. It ran a shell command, read the output, and used that to formulate its response. That one casual question triggered real execution on your device.
Now scroll through a few more conversations and watch the tool calls stack up. File reads. Shell commands. Web searches. API requests. Every conversation is a chain of autonomous actions that your agent took on behalf of a human, on a real machine, with real permissions.
This is what's been happening every time someone on your team talks to their agent. You just couldn't see it before.
Step 4: Go to the Tools page
Navigate to Tools. This page has two tabs: Definitions and Calls.
Definitions is your tool inventory. It displays every tool that has been discovered across your environment. Some of these ship out of the box with Claude Code: Bash, ReadFile, WriteFile, Edit, SearchWeb, and others. These are the built-in capabilities that let your agent interact with your machine and the internet.
But this is also where you'll see something more interesting: the MCP servers your users have connected to their agents.
MCP servers are how agents get access to external tools and services. A developer adds one to give their agent access to a database, or Slack, or email, or your production infrastructure. They're easy to add and most developers add them without thinking of it as a security decision. They're thinking about productivity. From a security perspective, each one is an integration point that connects an autonomous agent to a resource you might not have approved.
Click on any tool to view its schema. This is the set of instructions given to the LLM so it knows how to use the tool: what inputs it accepts, what outputs to expect, and how to invoke it. This is how the LLM "learns" what it can do. Every tool your agent has access to has one of these definitions, and now you can read them.
Now click the Calls tab. This is where you see what tools have actually been executed. Not just which tools exist, but which ones were invoked, with what inputs, and what they returned. Click into the details of any tool call and you'll see exactly what went in and what came out.
That bash call from your "What files are in my directory?" question? You can see the exact command that was executed, the arguments that were passed, and the full output that came back. For every tool call, across every agent, across every device.
Step 5: Go to the Policies page
Navigate to Policies. This is where you define access control rules for your agents and tools. You can write specific policies for invoking tools, launching agents, and connecting to MCP servers.
Don't worry about implementing a policy right now. A post on "What should your first policy be?" is coming soon. For now, I want to show you something else.
Click the Activity Log tab.
This is where Ceros gets different from anything else you've seen. Drill into one of the entries.
What you're looking at is not a log line. It's a complete forensic snapshot of the environment at the exact moment an agent was invoked. Here's the kind of detail you'll see:
The device that launched the session: macOS Sequoia 15.6.1, Darwin kernel 24.6.0, 16GB of RAM. Whether disk encryption is enabled (FileVault, specifically, and what encryption type). Whether Secure Boot is on. Whether endpoint protection is running. Whether System Integrity Protection is enabled, and if any protections have been disabled. Whether Gatekeeper is active. Whether kernel extension user consent is required.
The full process ancestry of how the agent was launched. Not just "Claude Code is running." The entire chain: /usr/bin/login spawned /bin/zsh, which ran /opt/homebrew/bin/node, which launched the Ceros CLI wrapper (ceros claude), which started the agent session. Every process in that chain is captured with its PID, start time, executable path, and the user context it's running under.
The binary signatures. Every executable in the process ancestry is verified. The Ceros binary, the Node.js runtime, the zsh shell, the login process. Each one is checked with macOS code signing verification, and you can see the signer identity, verification status, and whether it was cryptographically validated.
The user identity. Not just a username from a token. The OS-level user ID, the effective user ID, the username. You know that hpark (UID 502) launched this session from Parks-MacBook-Air.local, and you can tie that back to a verified identity.
All of this data is collected in under 250 milliseconds. It travels with every request the agent makes. And it's signed so it can't be tampered with after the fact.
This is what we mean when we say Ceros starts on the machine. Other tools see an API call and try to reconstruct context. Ceros captures the full picture at the source: which human, on which device, in what security state, through which process tree, using which verified binaries, launched which agent. Before a single token is generated.
What you know now that you didn't five minutes ago
You've gone from assumptions to evidence. You can see every conversation your agents are having and the autonomous actions they're taking on behalf of your team. You can see every tool available to those agents, including MCP servers you didn't approve, and you can inspect the actual inputs and outputs of every tool call. And you have forensic-grade detail on the environment where every agent session originated.
This is what we call going from Level 0 (blind) to Level 1 (visible). You haven't written a single policy yet. You haven't blocked anything. But you can now answer questions that five minutes ago would have taken days of digging through logs and pinging three different teams.
What comes next
Most people spend a day or two just watching. Seeing what the real patterns look like versus what they assumed. That's worth doing. You want to understand your actual environment before you start writing rules for it.
When you're ready, the next step is writing your first policy. We recommend starting with an MCP server allowlist: approve the ones you trust, block everything else by default. It's the single highest-impact policy you can write, and it takes about two minutes.
But that's the next post.
For now, sign up at agent.beyondidentity.com, install the agent, and go see what your agents have actually been doing. You've been making decisions about AI security without this information. Once you have it, you won't go back.
Ceros is built by Beyond Identity. SOC 2 Type 2 compliant. FedRAMP Moderate ready. Deployable as cloud SaaS, self-hosted, or fully air-gapped on-premises.
Follow me on X: x.com/coltonchojnacki
Trending Resources
The Attacker Gave Claude Their API Key: Why AI Agents Need Hardware-Bound Identity
February 2, 2026
Beyond Identity Opens Early Access for the AI Security Suite
January 22, 2026
Unlock High-Fidelity Security with the New Beyond Identity App for Splunk
January 16, 2026
Beyond Identity Joins NVIDIA Inception Program to Advance Hardware-Enforced Security for the AI Era
January 5, 2026

Chips and SLSA: Why TPMs Matter for Code Commits
December 19, 2025

Why Is Code Provenance Non-Negotiable in the Age of AI?
December 17, 2025
.avif)
How Beyond Identity & Nametag Stop Identity Fraud at Onboarding & Recovery
November 19, 2025
.avif)
New: Self Remediation Features to Reduce Help Desk Tickets and Improve UX
November 13, 2025

Make Identity-Based Attacks Impossible
August 11, 2025
Meeting CJIS Compliance with WDL
May 27, 2025
PCI DSS Compliance with Beyond Identity
March 6, 2025
.avif)
Online Job Board Safety: How and Why To Avoid a Scam
March 7, 2024

ChatGPT's Dark Side: Cyber Experts Warn AI Will Aid Cyberattacks in 2023
February 29, 2024
Improving User Access and Identity Management to Address Modern Enterprise Risk
February 20, 2024

Okta Cyber Trust Report
January 5, 2024

Securing Remote Work: Insights into Cyber Threats and Solutions
October 30, 2023

Networking Dinner with MightyID and Tevora
December 9, 2025
Alphinia CISO Mastermind Dinner
December 1, 2025

Myriad360 Client Appreciation Celebration
November 20, 2025
GuidePoint Security Movie Premeire of Wicked
November 19, 2025
.avif)
How AI Is Accelerating Threats: The Inside Scoop on Emerging Phishing GPTs
November 18, 2025

GuidePoint Security 3rd Annual Houston Golf Outing
November 13, 2025
GuidePoint Security's Pinehurst Golf Outing
November 12, 2025
GuidePoint Security Public Sector Vendor Fair
November 5, 2025
