Beyond Identity + NextAuth.js
.avif)


What is NextAuth.js?
If you are implementing authentication in Javascript, then chances are you’ve heard of NextAuth.js (becoming Auth.js). Auth.js is a complete open-source authentication solution for web applications. It is designed from the ground up to support Next.js and Serverless.
It provides a simple and easy-to-use interface for implementing various authentication providers such as Google, Facebook, Twitter, and many more. It is an open-source library that is built on top of OAuth 2.0 and OpenID Connect (OIDC) protocols, making it secure and widely compatible with a variety of services.
Auth.js abstracts away the complexities of authentication and provides a unified API to work with different authentication providers. It simplifies the process of setting up authentication in your Next.js application and allows you to focus on building the core features of your application.
Their repository can be found here: https://github.com/nextauthjs/next-auth
What is Beyond Identity?
Beyond Identity is a company whose mission is to empower all people and businesses to securely, privately, and effortlessly control their digital identities. We provide you, the developer, with passkey-based sign on for your app.
There are no more passwords, even usernames become optional, and the entire experience is better and more secure for your users.
For more information, check out our blog covering our product for developers.
Auth.js + Beyond Identity
We are proud to announce that Beyond Identity is an official supporter and proud contributor of Auth.js. We are happy to introduce our Beyond Identity Provider, which as of Release @auth/core@0.5.0 allows developers to integrate our passwordless experience, along with our JavaScript Embedded SDK or Hosted Web Authenticator.
We have also released a new NextAuth Integration Guide.
Example
TL;DR: Here are some sample code snippets to help you get started!
In this post, we will cover the basics of Auth.js, including how to set it up and use it in your Next.js application.
Beyond Identity developer account
Before we get started, let’s sign up for your free Beyond Identity developer account.
You can read all about how to configure your developer account in out https://developer.beyondidentity.com/docs/v1/workflows/account-setup guide, but for this example, we will need three things:
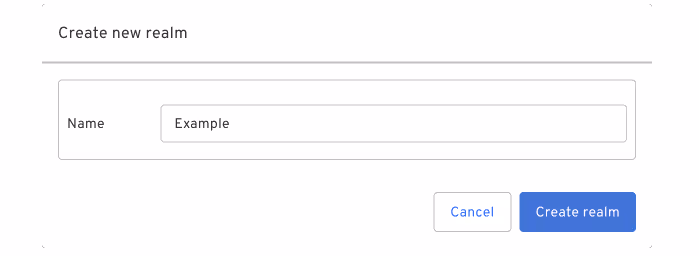
- A Realm, which is a namespace in your tenant that isolates identities and applications from other realms.
Give it a Name! For the purposes of this example, we will call it Example.
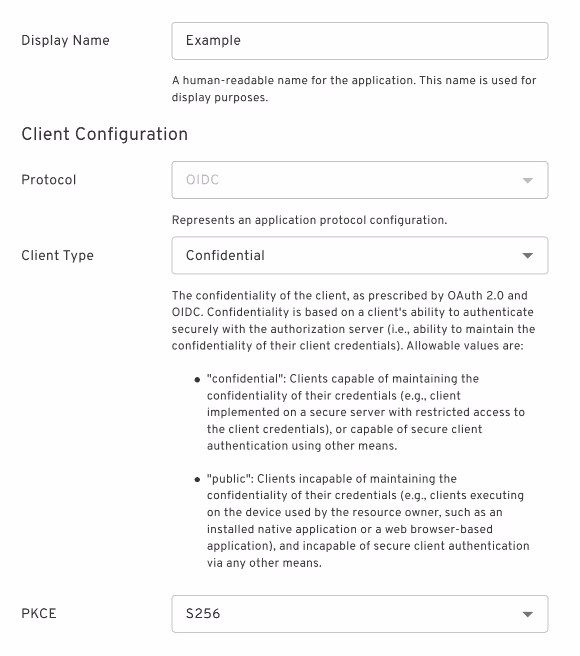
- An Application, which is an abstraction in the admin console that enables you to configure passkey binding and authentication in your mobile/web apps.
Give it a Display Name! For the purposes of this example, we will call it Example.
The important things to note here are Client Type, which should be Confidential, and PKCE, which should be S256.
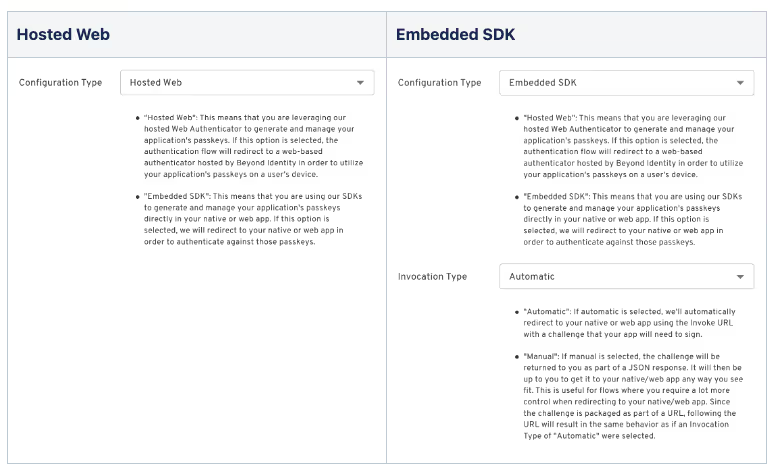
- An Authenticator Config, which is used to tell us how and where to invoke passkey creation and authentication flows for your native/mobile or web application.
The important thing to note here is Configuration Type. This can be either Hosted Web or Embedded SDK, with an Invocation Type of Automatic, but for the purposes of this example, we will choose Hosted Web.
Installing Auth.js
To get started with Auth.js, you need to install it in your Next.js application. You can do this by running the following command in your terminal:
npm install --save @auth/core
Alternatively, if you are using Yarn, you can run the following command:
yarn add --save @auth/core
Once the installation is complete, you can import Auth.js in your application:
import { Auth } from "@auth/core"
Configuring Auth.js
Next, you need to configure Auth.js by creating a pages/api/auth/[...nextauth].js file. This file will handle authentication requests and provide authentication callbacks to your application. Here is an example configuration for Auth.js that supports authentication with Beyond Identity:
import { Auth } from "@auth/core"
import BeyondIdentity from "@auth/core/providers/beyondidentity"

const request = new Request("https://example.com")
const response = await Auth(request, {
  providers: [
    BeyondIdentity({
      clientId: process.env.BEYOND_IDENTITY_CLIENT_ID,
      clientSecret: process.env.BEYOND_IDENTITY_CLIENT_SECRET,
      issuer: process.env.BEYOND_IDENTITY_ISSUER,
    }),
  ],
})
In this example, we are configuring Auth.js to use the Beyond Identity authentication provider. We pass in the issuer, clientId and clientSecret that we obtained from the Beyond Identity Admin Console you created in the first step.
You can add additional authentication providers by including them in the providers array.
Conclusion
Feel free to reach out on Slack if you have any questions! Happy coding!
What is NextAuth.js?
If you are implementing authentication in Javascript, then chances are you’ve heard of NextAuth.js (becoming Auth.js). Auth.js is a complete open-source authentication solution for web applications. It is designed from the ground up to support Next.js and Serverless.
It provides a simple and easy-to-use interface for implementing various authentication providers such as Google, Facebook, Twitter, and many more. It is an open-source library that is built on top of OAuth 2.0 and OpenID Connect (OIDC) protocols, making it secure and widely compatible with a variety of services.
Auth.js abstracts away the complexities of authentication and provides a unified API to work with different authentication providers. It simplifies the process of setting up authentication in your Next.js application and allows you to focus on building the core features of your application.
Their repository can be found here: https://github.com/nextauthjs/next-auth
What is Beyond Identity?
Beyond Identity is a company whose mission is to empower all people and businesses to securely, privately, and effortlessly control their digital identities. We provide you, the developer, with passkey-based sign on for your app.
There are no more passwords, even usernames become optional, and the entire experience is better and more secure for your users.
For more information, check out our blog covering our product for developers.
Auth.js + Beyond Identity
We are proud to announce that Beyond Identity is an official supporter and proud contributor of Auth.js. We are happy to introduce our Beyond Identity Provider, which as of Release @auth/core@0.5.0 allows developers to integrate our passwordless experience, along with our JavaScript Embedded SDK or Hosted Web Authenticator.
We have also released a new NextAuth Integration Guide.
Example
TL;DR: Here are some sample code snippets to help you get started!
In this post, we will cover the basics of Auth.js, including how to set it up and use it in your Next.js application.
Beyond Identity developer account
Before we get started, let’s sign up for your free Beyond Identity developer account.
You can read all about how to configure your developer account in out https://developer.beyondidentity.com/docs/v1/workflows/account-setup guide, but for this example, we will need three things:
- A Realm, which is a namespace in your tenant that isolates identities and applications from other realms.
Give it a Name! For the purposes of this example, we will call it Example.
- An Application, which is an abstraction in the admin console that enables you to configure passkey binding and authentication in your mobile/web apps.
Give it a Display Name! For the purposes of this example, we will call it Example.
The important things to note here are Client Type, which should be Confidential, and PKCE, which should be S256.
- An Authenticator Config, which is used to tell us how and where to invoke passkey creation and authentication flows for your native/mobile or web application.
The important thing to note here is Configuration Type. This can be either Hosted Web or Embedded SDK, with an Invocation Type of Automatic, but for the purposes of this example, we will choose Hosted Web.
Installing Auth.js
To get started with Auth.js, you need to install it in your Next.js application. You can do this by running the following command in your terminal:
npm install --save @auth/core
Alternatively, if you are using Yarn, you can run the following command:
yarn add --save @auth/core
Once the installation is complete, you can import Auth.js in your application:
import { Auth } from "@auth/core"
Configuring Auth.js
Next, you need to configure Auth.js by creating a pages/api/auth/[...nextauth].js file. This file will handle authentication requests and provide authentication callbacks to your application. Here is an example configuration for Auth.js that supports authentication with Beyond Identity:
import { Auth } from "@auth/core"
import BeyondIdentity from "@auth/core/providers/beyondidentity"

const request = new Request("https://example.com")
const response = await Auth(request, {
  providers: [
    BeyondIdentity({
      clientId: process.env.BEYOND_IDENTITY_CLIENT_ID,
      clientSecret: process.env.BEYOND_IDENTITY_CLIENT_SECRET,
      issuer: process.env.BEYOND_IDENTITY_ISSUER,
    }),
  ],
})
In this example, we are configuring Auth.js to use the Beyond Identity authentication provider. We pass in the issuer, clientId and clientSecret that we obtained from the Beyond Identity Admin Console you created in the first step.
You can add additional authentication providers by including them in the providers array.
Conclusion
Feel free to reach out on Slack if you have any questions! Happy coding!
Trending Resources
.png)
Your First 5 Minutes with Ceros: See What You've Been Missing
February 24, 2026

The Attacker Gave Claude Their API Key: Why AI Agents Need Hardware-Bound Identity
February 2, 2026

Beyond Identity Opens Early Access for the AI Security Suite
January 22, 2026

Unlock High-Fidelity Security with the New Beyond Identity App for Splunk
January 16, 2026

Beyond Identity Joins NVIDIA Inception Program to Advance Hardware-Enforced Security for the AI Era
January 5, 2026

Chips and SLSA: Why TPMs Matter for Code Commits
December 19, 2025

Why Is Code Provenance Non-Negotiable in the Age of AI?
December 17, 2025
.avif)
How Beyond Identity & Nametag Stop Identity Fraud at Onboarding & Recovery
November 19, 2025

Make Identity-Based Attacks Impossible
August 11, 2025

Meeting CJIS Compliance with WDL
May 27, 2025
PCI DSS Compliance with Beyond Identity
March 6, 2025
.avif)
Online Job Board Safety: How and Why To Avoid a Scam
March 7, 2024

ChatGPT's Dark Side: Cyber Experts Warn AI Will Aid Cyberattacks in 2023
February 29, 2024

Improving User Access and Identity Management to Address Modern Enterprise Risk
February 20, 2024

Okta Cyber Trust Report
January 5, 2024

Securing Remote Work: Insights into Cyber Threats and Solutions
October 30, 2023

Networking Dinner with MightyID and Tevora
December 9, 2025
Alphinia CISO Mastermind Dinner
December 1, 2025

Myriad360 Client Appreciation Celebration
November 20, 2025
GuidePoint Security Movie Premeire of Wicked
November 19, 2025
.avif)
How AI Is Accelerating Threats: The Inside Scoop on Emerging Phishing GPTs
November 18, 2025

GuidePoint Security 3rd Annual Houston Golf Outing
November 13, 2025
GuidePoint Security's Pinehurst Golf Outing
November 12, 2025
GuidePoint Security Public Sector Vendor Fair
November 5, 2025
